We can all appreciate a slick shifting drivetrain, and we all hate it when our drivetrain turns on us. One of the easiest ways to prevent this from happening is to ensure your chain is sized correctly. When too long, it can cause premature derailleur wear, shift poorly and bounce around with the potential of derailing. When too short, it can jam the drivetrain or cause the derailleur to actually snap. But you don't have to worry about this unless you have to put on a new chain, right?
Not necessarily. Quite often, this issue starts at the LBS: many chains are not properly sized from the factory and some shops don't necessarily check this on every bike. If you should try to “match the length” of the current chain when putting on a new one, this can often result in a chain that is too long or too short, depending on the condition (and length) of the previous one. But how do you become a pro at sizing your chain to the correct length? It's as simple as doing the one thing you never should: crosschaining.
You can read more about it after the jump:
Going Big
 We're talking big ring/big cog. Let's take it step by step:
- Remove the old chain and either toss it (or save it to swap in at a later date if you're rotating chains.)
- Shift the front derailleur cage over the largest chainring.
- Shift the rear derailleur on the smallest cog.
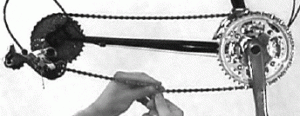
- Run the chain through the front derailleur and around the large chainring.
- Wrap the chain around the largest rear cog, but don't thread it through the derailleur.
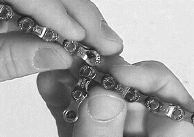
 Pull the chain tight, and make a mental note of the closest rivet where the two ends can mate together. Remember that you'll need to mate inner and outer plates (or two inner plates if you're using a quick link.)
- From that closet rivet, add two rivets (which is two links or approximately one inch.) Break the chain at that point, remembering to account for how you're rejoining the chain.
- Thread the chain through the rear derailleur and then join the ends.
Looking Good
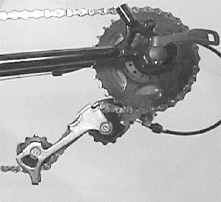
 A properly sized chain, when threaded through the derailleurs and crosschained into the big/big combo should have some bends in it where it wraps around the rear derailleur jockey wheels, as pictured to the left. If the chain is almost straight (and the top jockey wheel is smashed up against the big cog) it's almost certain that the chain is too short. So be sure to check your work but crossing up the chain and ensure that you're on target. After all, it would suck to trash the drivetrain from something as trivial as a poorly sized chain.

Good article since i just re-sized a new chain last night. Frustrating experience to say the least. Now my chain is skipping at the spot i cut / repegged. Any trick to get that spot in the chain to bend properly through the deraileur wheels, or will it wear in with time?
Great site
I typically use a quick link (SRAM, KMC, etc) but if you’re using a pin, you can do a couple things.
First, check to make sure that the pin is pressed equally into the chain on both sides and that it’s not sticking out more on either side of the side plates.
Second, if it’s pressed in properly and is just tight, I grab the chain by the plates and give it a couple of bends laterally in both directions. This flexes the plates against the pin and helps to loosen it up just enough that it moves freely. That should get it loosened up enough that it moves freely around the derailleur.
Sweet i’ll try that. Didn’t realize that SRAM changed their powerlink to a one time use. once it’s set you cannot unlock it.
That’s generally why I use KMC quick links. Re-useable and pretty darn simple to use with bare hands (more than Connex links, at least in my experience.)
With a few turns of the chain tool shes shifting perfect now. Pin was slightly off center, causing it to hang up as it goes through the cassette. Thanks coach!
Awesome! Easy fixes are the best.