Quadrant analysis is a tool that can be found in many power analysis software packages. Programs like Golden Cheetah, Training Peaks and WKO+ offer quadrant analysis features. Learning how to read a quadrant analysis plot can teach you a lot about your training, racing and riding. Above and beyond functional threshold power, watts per kilogram and training stress score, the quadrant analysis is probably one of the most valuable charts you can find.
It allows you to see a snapshot of what kinds of efforts went into your performance. Then you can look at your training data and see if it matches up with your goal races and performance data. It doesn't come easy though: it takes some time to understand the QA plot and how to use it. Once you get it, it becomes a powerful tool in the arsenal of helping you understand your fitness.
Check out these tips to help you get the most out of your quadrant analysis plot and make your training more effective.
Learning to read the Quadrant Analysis plot
Learning to read the quadrant analysis plot is not as difficult as it may seem at first. On the X axis, you'll find a cadence distribution. This is expressed as “circumferential pedal velocity” in meters per second. On the Y axis is a force distribution plot. This is expressed in newtons of force applied to the pedal. Power is simply a product of force times velocity, so by selecting a point on the x axis and a point on the y axis, you can find the power produced by calculating the product. Thankfully, your software will do all this for you.
There is also a downward sloping curve that represents your functional threshold power (or Critical Power in Golden Cheetah) at different cadence and force distributions. You'll be able to see if you spent a lot of time above your functional threshold power or if most of your efforts were below threshold. The quadrant analysis plot will also show you holes in your fitness below that power curve and allow you to adapt your training to fill in those weak spots.
1: Analyze for cadence ranges and expand them
I've talked a lot about the importance of cadence in the past. Turning the pedals seems to be very simple, but cadence plays a vital role in power production. As I noted above, half of the equation for power is velocity, so how fast you turn the pedals is critical to developing power.
 You can analyze your workouts for cadence distribution to figure out a few different things. The big thing you'll find is what your “preferred cadence” is. This is going to be the point at which you feel the most comfortable riding. You'll generally default to this cadence in most circumstances. But there are other times when being able to vary your cadence is important. Climbing, descending and rolling fast on the flats can give you fits if you're leg speed is not up to par.
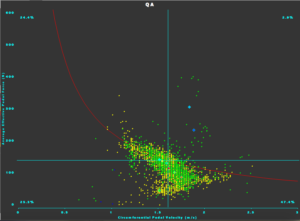
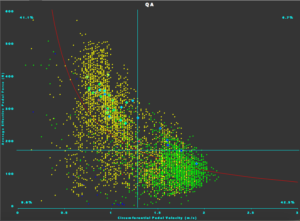
Take a look at the workouts on the quadrant analysis graphs to the right.
If you see a lot of points all clustered around a single point on the X axis, you're risking becoming a “one-speed rider.” This is the kind of rider that looks like a duck in water. Their legs never change speed and they pedal the same all the time. Being a one-speed rider makes you very limited in the kind of efforts you can execute, leaving you at the mercy of cyclists with better leg speed skills than yourself.
 Compare that to a ride where you're riding at a lot of different cadence ranges. You can instantly see the huge variation in cadence range and with it, a lot of versatility in riding capability. This type of rider doesn't have any glaring weakness and can handle switching cadences at will. This versatility will allow you to accelerate out of corners, cover attacks and change power output at will.
If you want to work on improving your neuromuscular skills and expand your cadence range, you can read about my singlespeed workout and my musical based cadence workout.
2: Match your training to your event goals
The quadrant analysis graph can be critical in evaluating if your training is appropriate for your goals. By evaluating where on the graph your training falls, you can adapt your training to different events. First, we need to discuss what each of the quadrants means.
- Quadrant I (upper right): High cadence, high force. Sprint type work.
- Quadrant II (upper left): Low cadence, high force. Hill climbing work.
- Quadrant III (lower left): Low cadence, low force. Easy pedaling (in the pack or during rest periods between intervals.)
- Quadrant IV (lower right): High cadence, low force. Fast pedaling with little resistance (sitting in the middle of a pack or pedaling downhill.)
Now that you know what each quadrant represents, look at the plot of how your own graph stacks up. The best way to do this is to look at a similar event. Even better, if you've ridden your goal event in the past, plug that file into your quadrant analysis and see what it looks like.
As an example, look at the two graphs above. The bottom one is a good example of what a road race may look like. If your training looks like the graph on the top, it won't match up with your event goals. Of course, you'll have to realize that structured workouts will create clusters on the QA graph. Those clusters of points should mimic some of the demands of your goal, so adjust your training accordingly.
 3: Evaluate for “clustered fitness”
This point is pretty similar to the last one, but it relates to your overall fitness, not necessarily your event specific fitness. As you begin to add multiple rides into your quadrant analysis, you'll start to see patterns in your training and riding. You can evaluate for these patterns and work to fill in the gaps.
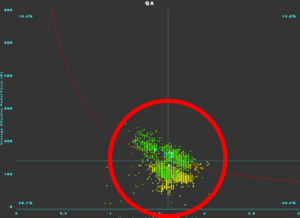
For example, take a look at the quadrant analysis plot to the right. What you'll see is a cluster of work right around sweetspot cadence and intensity. Notably, there's a lot of space to the extreme right and left with no data in it. That would be a good place to work on adding additional training stress.
If you find that you cover much of the center of the plot, start pushing your training into the extreme corners of the chart. This means work on low cadence, high AND low force intervals as well as high cadence, high AND low force intervals. Modifying your training in this way can make you more rounded and able to handle more situations in a ride or race.
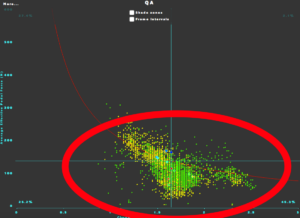
 The bottom plot on the right shows a much more rounded and variable type of fitness.
You can see that there is a large cluster of data points around the sweetspot cadence and intensity. There are also lots of points that fall far outside that centralized cluster. You can even see from the size of the red circle that there's more variation in training stress in the second chart. You should be aiming to make at least some of your workouts more of these varied, “kitchen sink” type workout.
The bottom line on quadrant analysis
You should start adding training that pushes you into the extreme corners of the quadrant analysis during at least half your rides. Don't get stuck as a 90RPM 300 W rider. Tailor your training to your goal events. Watch out for repetitive, clustered fitness. You may be surprised at what you find.
Remember, quadrant analysis is just a tool in your toolbox. Don't neglect all the other markers of your fitness and training progress. It's simply a complimentary piece of the puzzle that can help you plug up the holes in your fitness. Getting obsessed with the quadrant analysis plot can be counter productive as well. You can't simply work on the weaknesses and expect your fitness to improve. You have to nurture your strengths as well if you intend to become a strong, efficient, complete rider. Hopefully, these tips will help you effectively utilize the quadrant analysis plot and revamp your fitness.
